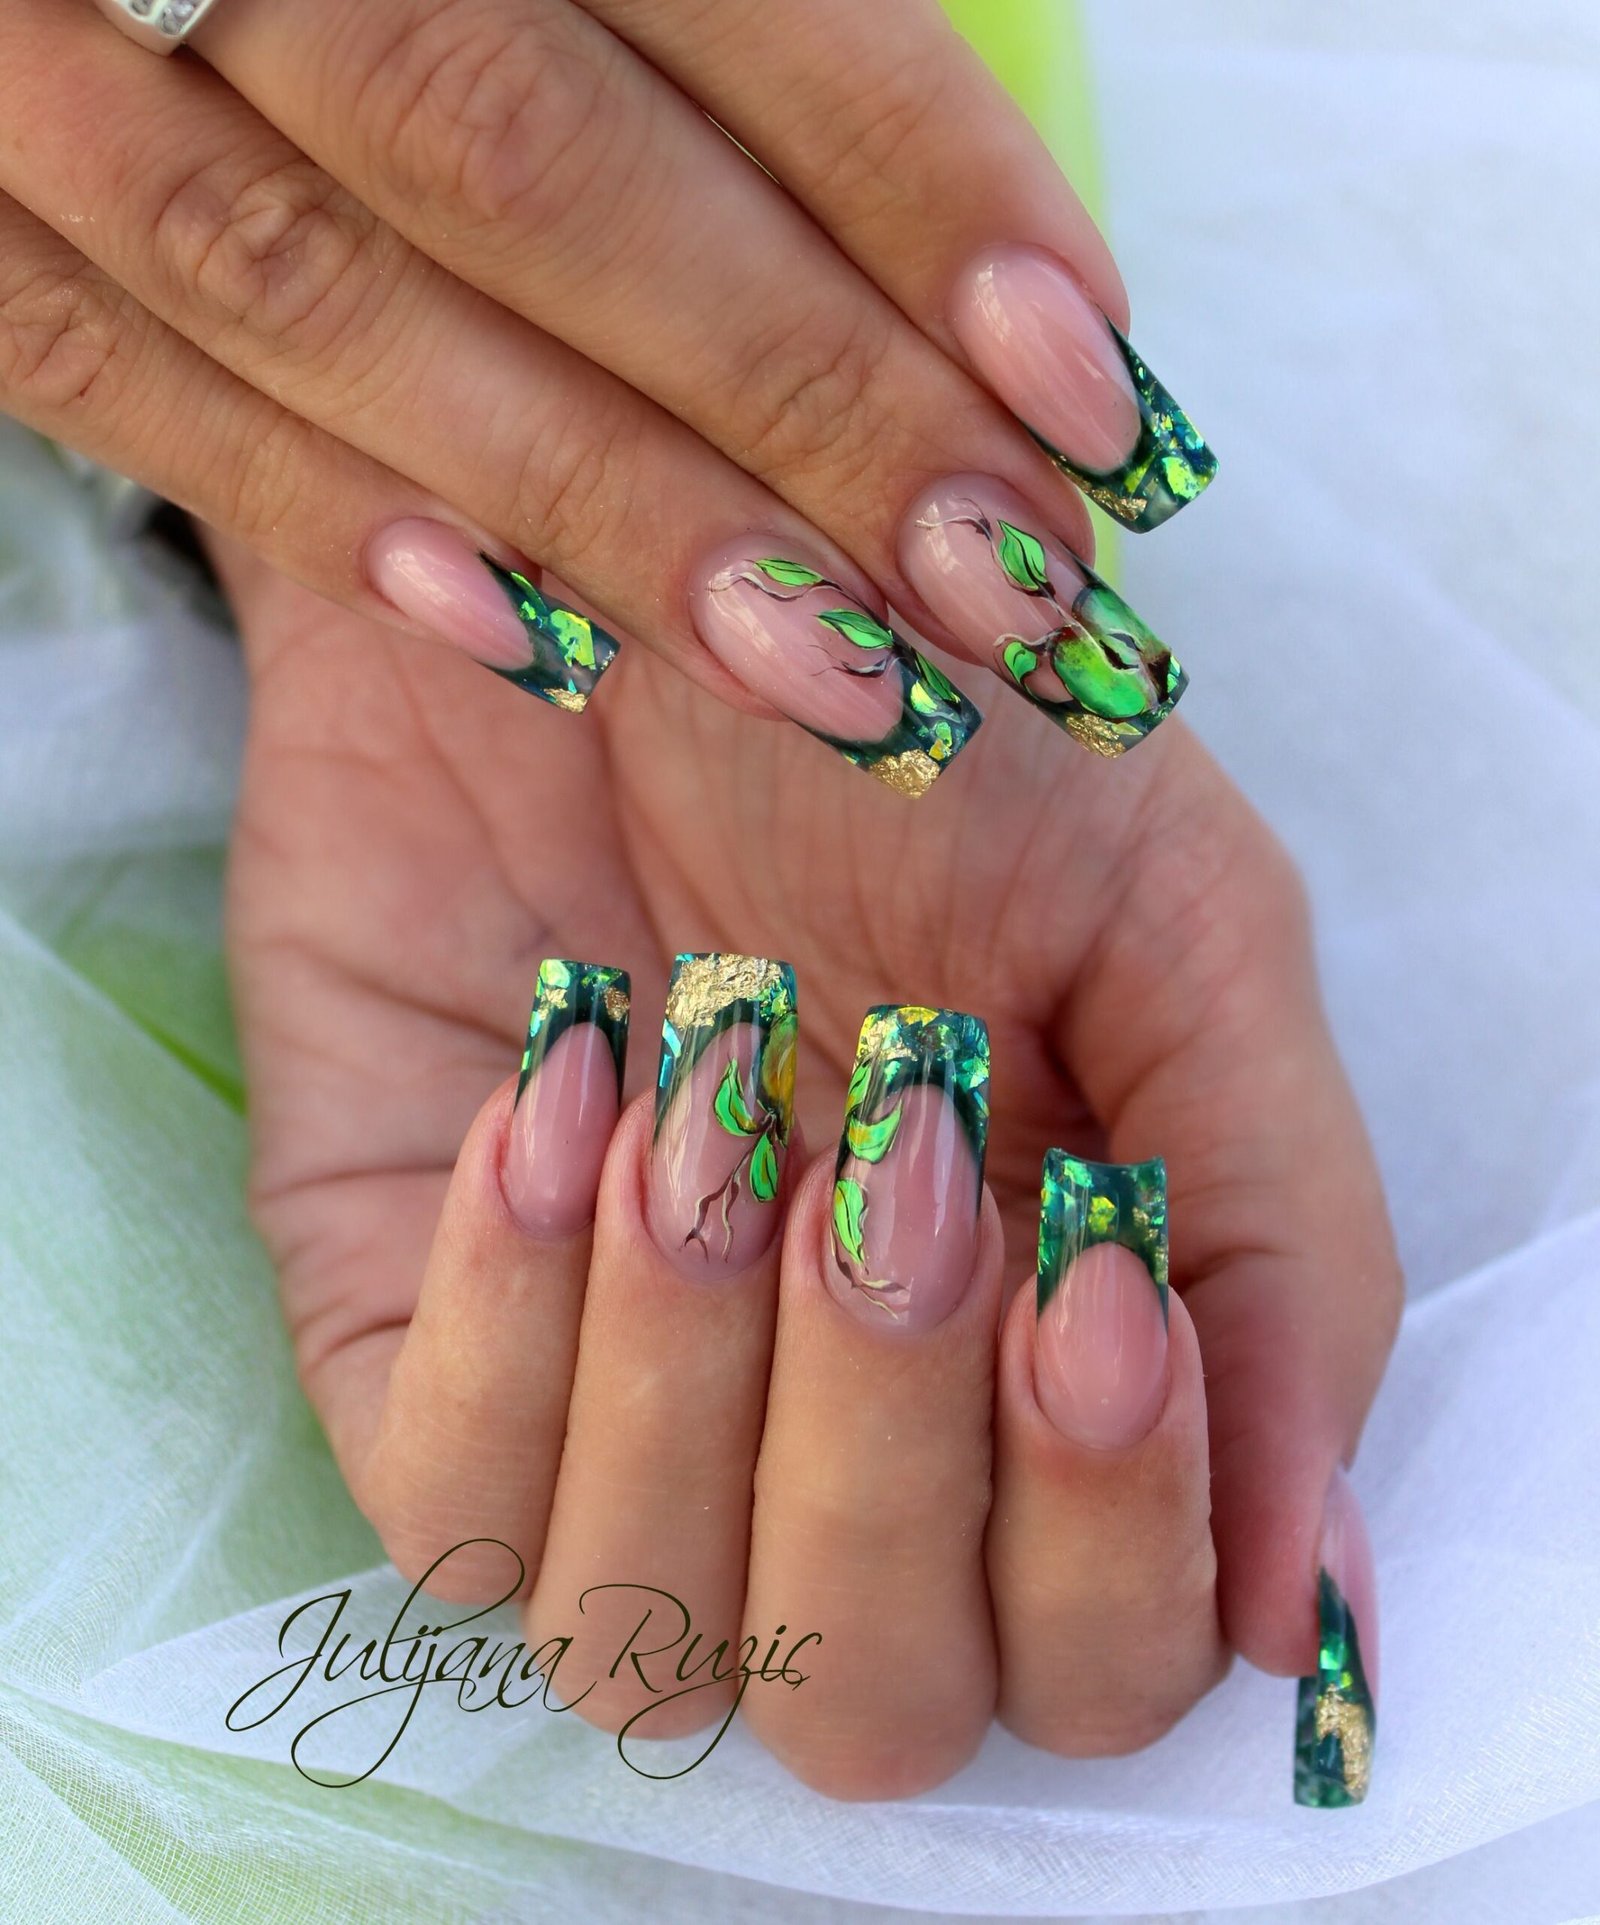
Poison Ivy Nail Art features bold, green designs inspired by the iconic comic book character. It’s perfect for fans of unique, edgy styles.
Poison Ivy Nail Art draws inspiration from the notorious villain in the Batman series. This nail art trend emphasizes vibrant greens, leafy patterns, and intricate designs that mirror Poison Ivy’s botanical theme. Ideal for comic book fans and anyone wanting a daring, nature-inspired look, these nails make a bold statement.
The designs can range from simple green hues to complex, detailed artwork, allowing for a lot of creativity. Poison Ivy Nail Art is not just a style but an expression of individuality and a love for the iconic character. Perfect for cosplay or everyday wear, these nails stand out.

Credit: www.pinterest.com
Introduction To Poison Ivy Nail Art
Poison Ivy Nail Art is inspired by the famous comic book character. It combines vibrant greens and bold reds. This nail art is perfect for those who love nature and comics. Poison Ivy Nail Art can make your nails look bold and beautiful.
Why Choose Poison Ivy
Choosing Poison Ivy Nail Art can make a bold statement. Here are some reasons:
- Unique and Creative: Stand out with unique designs.
- Versatile: Suitable for various occasions.
- Nature-Inspired: Perfect for nature lovers.
Popular Color Palettes
Color palettes are vital for Poison Ivy Nail Art. Popular choices include:
| Color | Description |
|---|---|
| Green | Represents Poison Ivy’s leafy attire. |
| Red | Highlights the fiery passion of the character. |
| Gold | Adds a touch of elegance and sparkle. |
Essential Tools And Materials
To create stunning Poison Ivy Nail Art, you’ll need specific tools and materials. This guide will help you gather everything you need. Let’s dive into the essentials for your nail art masterpiece.
Must-have Tools
- Nail Clippers: Trim your nails to the desired length.
- Nail File: Shape your nails smoothly.
- Cuticle Pusher: Push back your cuticles gently.
- Detail Brush: Perfect for drawing tiny details.
- Dotting Tool: Create dots and small designs effortlessly.
- Nail Art Stickers: Add extra flair to your design.
- Top Coat: Seal and protect your nail art.
Recommended Nail Polishes
| Color | Brand | Shade Name |
|---|---|---|
| Green | OPI | Don’t Mess with OPI |
| Red | Essie | Really Red |
| Black | Sally Hansen | Black Out |
| Gold | Zoya | Goldie |
With these tools and polishes, your Poison Ivy Nail Art will look fantastic. Gather them all to start your creative journey.
Basic Techniques
Poison Ivy nail art is a stunning and creative way to express yourself. Learning the basic techniques is essential for achieving a flawless design. This section will guide you through the steps of creating beautiful ivy leaves and perfecting the green gradient.
Creating Ivy Leaves
Creating ivy leaves requires patience and precision. Follow these steps:
- Start with a base coat to protect your nails.
- Apply a light green base color and let it dry.
- Use a thin brush to draw the leaf outlines with dark green polish.
- Fill in the leaves with a slightly lighter green shade.
- Add veins to the leaves using a fine nail art pen.
- Finish with a top coat to seal your design.
| Step | Action |
|---|---|
| 1 | Start with a base coat |
| 2 | Apply light green base color |
| 3 | Draw leaf outlines with dark green |
| 4 | Fill leaves with lighter green |
| 5 | Add veins with a nail art pen |
| 6 | Finish with a top coat |
Perfecting The Green Gradient
A green gradient gives your Poison Ivy nail art depth and realism. Follow these steps:
- Start with a white base coat for a vibrant gradient.
- Use a makeup sponge to apply three shades of green polish.
- Blend the colors by dabbing the sponge on your nails.
- Repeat the process until you achieve the desired gradient.
- Clean up any excess polish around your nails.
- Seal with a clear top coat for a smooth finish.
- White base coat
- Makeup sponge
- Three shades of green polish
- Clear top coat
By mastering these basic techniques, you can create stunning Poison Ivy nail art. Practice regularly to improve your skills and create unique designs.

Credit: www.tiktok.com
Advanced Design Ideas
Delve into the world of Poison Ivy Nail Art with advanced design ideas. Elevate your nail art game by exploring intricate techniques and creative elements. Here, we present two captivating concepts: 3D Ivy Effects and Combining with Other Elements.
3d Ivy Effects
Create a stunning impact with 3D Ivy Effects. Use acrylic or gel to build layers. This adds a realistic dimension to your nails. First, paint a base color. Green or nude works best. Then, use a fine brush to shape ivy leaves. Add depth with darker shades and highlights.
Here are the materials you’ll need:
- Acrylic or gel
- Fine brush
- Base color
- Darker shades and highlights
Seal the design with a top coat. Your nails will look like a real ivy vine. This technique requires patience but the results are worth it.
Combining With Other Elements
Mix Poison Ivy designs with other elements for a unique look. Pair ivy with flowers, butterflies, or geometric shapes. This creates a balanced and eye-catching design.
Here are some combination ideas:
| Element | Design Tip |
|---|---|
| Flowers | Paint ivy on one nail and flowers on the next. |
| Butterflies | Add a butterfly resting on an ivy leaf. |
| Geometric Shapes | Use triangles or circles to frame the ivy. |
Start with a simple base. Add the ivy design first. Then, incorporate the other elements. This layered approach ensures each detail stands out.
Experiment with different combinations. Your nails will become a canvas of creativity. These advanced design ideas will make your Poison Ivy Nail Art truly exceptional.
Diy Poison Ivy Nail Art
Are you a fan of the iconic Poison Ivy character? Want to flaunt her green and leafy look on your nails? This guide will help you create stunning DIY Poison Ivy Nail Art. Follow these simple steps and avoid common mistakes to achieve professional results at home.
Step-by-step Guide
- Gather Your Supplies
- Green nail polish
- Leaf nail stickers
- Clear top coat
- Nail art brushes
- Acetone and cotton pads
- Prepare Your Nails
Remove old polish. Trim and file your nails. Push back cuticles.
- Apply Base Color
Paint your nails with green polish. Let it dry completely.
- Add Leaf Stickers
Place the leaf stickers on your nails. Press them firmly.
- Detailing with Brushes
Use nail art brushes to add veins to the leaves. Be precise.
- Seal with Top Coat
Apply a clear top coat. This will protect your design.
Common Mistakes To Avoid
- Skipping Base Preparation
Always prepare your nails. This ensures better polish adhesion.
- Rushing Drying Time
Let each layer dry completely. This prevents smudges.
- Using Thick Layers
Apply thin layers of polish. Thick layers take longer to dry.
- Ignoring Detailing
Detailing makes your design pop. Take your time with it.
- Forgetting the Top Coat
Always use a top coat. It gives your nails a glossy finish.

Credit: www.instagram.com
Professional Nail Art Services
Enhance your nails with Poison Ivy Nail Art by professional nail artists. With their expertise, your nails will look stunning and unique. These experts use high-quality materials and techniques to ensure your nail art lasts longer and stands out.
Finding A Nail Artist
Finding the right nail artist for Poison Ivy Nail Art can be simple. Start by checking local salons and asking for recommendations. Online reviews and social media can also help you find talented artists.
- Check online reviews
- Ask for recommendations
- Browse social media
Make sure to view their portfolio. This will show you their skills and style. Choose an artist whose work you love. This ensures you get the best results.
What To Expect
When getting Poison Ivy Nail Art, expect a detailed process. The nail artist will start by preparing your nails. They will clean and shape your nails, ensuring a smooth base.
- Nail preparation
- Base coat application
- Design creation
- Top coat application
Next, they will apply a base coat. This helps the design last longer. The artist will then create the Poison Ivy design using various techniques. They might use brushes, stamps, or decals. Finally, a top coat will be applied. This seals the design and adds shine.
Professional nail artists ensure a comfortable and enjoyable experience. They pay attention to detail and use the best products. Your nails will look fabulous and feel great.
Maintenance And Care
Poison Ivy nail art looks stunning. To keep it looking fresh, proper maintenance and care are essential. Follow these tips to ensure your design stays vibrant and damage-free.
Long-lasting Tips
To make your Poison Ivy nail art last, follow these steps:
- Avoid harsh chemicals: Wear gloves while cleaning or washing dishes.
- Moisturize regularly: Use hand cream to keep your cuticles healthy.
- Protect from water: Limit exposure to water to prevent chipping.
- Use a top coat: Apply a clear top coat every few days for extra protection.
Repairing Damaged Art
If your Poison Ivy nail art gets damaged, here’s how to fix it:
- Buff gently: Smooth out any rough edges with a nail buffer.
- Apply a patch: Use a tiny piece of matching nail art to cover the damaged area.
- Seal with top coat: Apply a clear top coat to secure the patch.
- Touch up: Use a nail art pen to fill in any missing details.
By following these tips, your Poison Ivy nail art will stay beautiful and last longer. Enjoy your stunning nails!
Inspiration Gallery
Welcome to our Inspiration Gallery. Here you’ll find the best Poison Ivy nail art designs. From celebrity nails to user-submitted creations, get inspired!
Celebrity Poison Ivy Nails
Many celebrities love Poison Ivy nails. They often show them off at events. Here are some stunning designs:
- Rihanna: Rihanna’s nails featured dark green and ivy leaves. She added a touch of glitter.
- Kylie Jenner: Kylie opted for a matte finish with intricate ivy patterns.
- Beyoncé: Beyoncé’s nails had a glossy green base with gold ivy accents.
| Celebrity | Design Features |
|---|---|
| Rihanna | Dark green, ivy leaves, glitter |
| Kylie Jenner | Matte finish, intricate ivy patterns |
| Beyoncé | Glossy green base, gold ivy accents |
User-submitted Designs
Our community is creative! Check out these user-submitted Poison Ivy nail designs:
- @nailartist123: A mix of green shades with tiny ivy leaves.
- @ivyqueen: Neon green nails with bold ivy lines.
- @nailsbyemma: Soft pastel green with subtle ivy details.
Want to share your design? Tag us on Instagram with #PoisonIvyNails.
Final Thoughts
Poison Ivy nail art can be a delightful way to express your love for nature and creativity. Whether you’re a nail art novice or a seasoned pro, there’s always room to make your design uniquely yours. Here are some final thoughts on personalizing your Poison Ivy nail art and encouraging your creativity.
Personalizing Your Design
Personalizing your nail art design is key to making it stand out. Add your favorite colors to the mix. Use a combination of green, red, and black to mimic the real Poison Ivy look. Don’t be afraid to mix textures and finishes.
| Element | Suggestions |
|---|---|
| Base Color | Green, Red |
| Accent | Glitter, Rhinestones |
| Finish | Matte, Glossy |
Choose a base color that represents the essence of Poison Ivy. Add accents like glitter or rhinestones for extra flair. Finally, decide between a matte or glossy finish to complete your look.
Encouraging Creativity
Encouraging creativity is essential in nail art. Start by sketching your ideas on paper. This helps visualize the design. Next, gather all the tools and materials needed.
- Nail polish in various colors
- Detail brushes
- Top coat
- Decorative elements (glitter, rhinestones)
Experiment with different patterns and techniques. Try painting leaves, vines, or even small flowers to add to the Poison Ivy theme. Each nail can tell a different part of the story.
Remember, the goal is to have fun and express yourself. There are no rules in creativity. Enjoy the process of making your Poison Ivy nail art unique!
Frequently Asked Questions
What Is Poison Ivy Nail Art?
Poison Ivy nail art is a design inspired by the DC Comics character Poison Ivy. It features green hues, ivy leaves, and sometimes glitter to mimic her enchanting nature.
How To Create Poison Ivy Nail Art?
To create Poison Ivy nail art, start with a green base. Add ivy leaf patterns using a fine brush. Finish with a top coat.
What Tools Are Needed For Poison Ivy Nails?
You need green nail polish, a fine brush for detailing, and a top coat. Optional tools include nail stickers and glitter.
Can Beginners Do Poison Ivy Nail Art?
Yes, beginners can do Poison Ivy nail art. Start with simple green polish and add stickers. Practice makes perfect.
Conclusion
Poison Ivy nail art offers a unique and edgy style. It’s perfect for making a bold fashion statement. Experiment with different shades of green and intricate designs. Show off your creativity and embrace the power of nature-inspired nails. Try Poison Ivy nail art for your next manicure and stand out effortlessly.