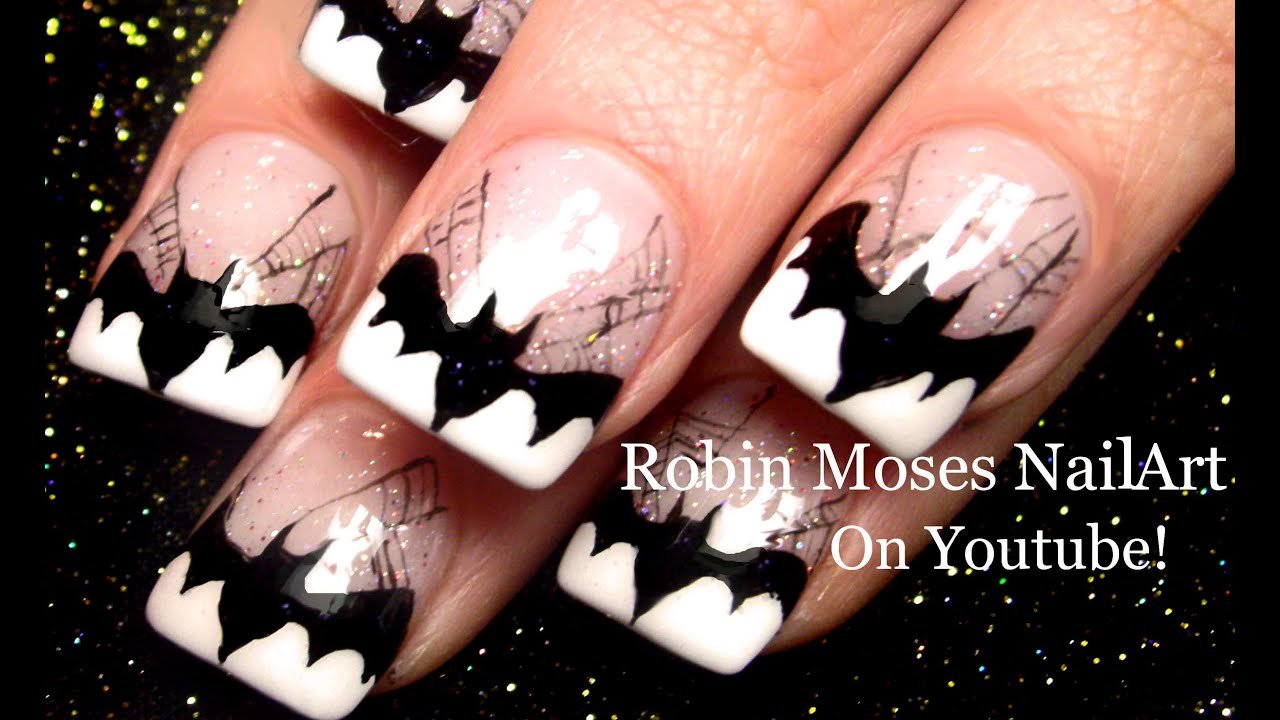
Bats Nail Art is a trendy design perfect for Halloween or spooky-themed events. It combines dark colors with bat silhouettes for a striking look.
Bats Nail Art stands out for its edgy and unique appeal. This design utilizes dark shades like black, purple, or deep red as the base. Bat silhouettes are then added using nail stamps, stickers, or freehand drawing. The result is an eye-catching and mysterious aesthetic, perfect for the spooky season.
This nail art style suits both short and long nails and can be customized with glitter or other embellishments. Ideal for Halloween parties or those who love gothic-inspired fashion, Bats Nail Art offers a creative and fun way to express your style.

Credit: www.instagram.com
Essential Tools And Materials
Creating stunning bats nail art requires the right tools and materials. Having the right supplies ensures a smooth and enjoyable process. Below are the essential items needed to achieve perfect bats nail art designs.
Nail Polishes
Selecting the right nail polishes is crucial. You’ll need a black polish for the bats and a contrasting color for the background. Here are some recommendations:
- Black Nail Polish: For crisp, clear bat shapes.
- White or Light-colored Polish: Makes the bats stand out.
- Top Coat: Adds shine and longevity to your design.
Brushes And Dotting Tools
Brushes and dotting tools are vital for detailed work. They help in creating precise and intricate bat designs. Below is a list of useful tools:
| Tool | Purpose |
|---|---|
| Fine Detail Brush | For drawing bat outlines. |
| Medium Brush | For filling in bats. |
| Dotting Tool | For creating bat eyes. |
Stencils And Stickers
Using stencils and stickers can simplify the process. They help in achieving consistent bat shapes. Consider these options:
- Bat Stencils: Easy to use and reusable.
- Bat Stickers: Quick application and great for beginners.
Stencils and stickers are perfect for those seeking a hassle-free experience.
Basic Techniques
Bats nail art is perfect for Halloween or any spooky occasion. This section will guide you through the basic techniques. Learn how to prepare your nails, apply a base coat, and create bat shapes.
Preparing Your Nails
Before starting, ensure your nails are clean and dry. Remove any old nail polish using a gentle nail polish remover.
- Trim and file your nails to your desired shape.
- Push back your cuticles using a cuticle pusher.
- Buff the surface of your nails for a smooth finish.
- Wash your hands to remove any dust.
Applying Base Coat
Apply a thin layer of base coat to protect your nails. This helps the nail polish adhere better and last longer.
- Open your base coat bottle and wipe excess on the rim.
- Apply one thin layer to each nail.
- Let the base coat dry completely before proceeding.
Creating Bat Shapes
Now it’s time to create the bat shapes. You can use a nail art brush, a dotting tool, or a stencil.
| Tool | Instructions |
|---|---|
| Nail Art Brush | Dip in black polish and draw bat wings and body. |
| Dotting Tool | Create dots for the bat’s body and connect with lines. |
| Stencil | Place on nail and fill in with black polish. |
Let your bat designs dry completely. Apply a top coat to seal and protect your artwork.
Simple Bat Designs
For a spooky and stylish Halloween look, simple bat designs are perfect. These designs are easy to create and look amazing. Let’s dive into two popular styles: Silhouette Bats and Flying Bats.
Silhouette Bats
Silhouette bats are dark, shadow-like designs. They are simple and elegant. You need black nail polish and a fine nail brush.
- Paint your nails with a light base color.
- Use the fine brush to draw bat shapes in black.
- Make sure to keep the shapes simple and consistent.
- Seal with a clear topcoat for durability.
Here are some tips for perfect silhouette bats:
| Tip | Description |
|---|---|
| Use a stencil | For precise shapes. |
| Practice first | On a piece of paper. |
| Keep it simple | Focus on basic bat outlines. |
Flying Bats
Flying bats add movement to your nails. They look dynamic and fun. This design is great for a more detailed look.
- Start with a dark base color, like navy blue or purple.
- Use white or silver polish to draw small bat shapes.
- Add a few dots around the bats to show movement.
- Finish with a clear topcoat to protect your design.
Tips for flying bats:
- Vary the sizes of the bats for a realistic effect.
- Mix in some glitter for a magical touch.
- Use a dotting tool for precise dots.
With these simple bat designs, your nails will be ready for Halloween. Try these styles and enjoy your spooky, stylish look!

Credit: www.tiktok.com
Advanced Bat Designs
Bats nail art has evolved beyond simple silhouettes. Advanced bat designs bring a new level of creativity and sophistication. These designs offer a unique twist, making your nails stand out. Let’s dive into some advanced bat designs that are sure to impress.
3d Bat Art
3D Bat Art is perfect for a dramatic look. This design involves using sculpting gels or acrylics to create bats that pop out from your nails. The 3D effect adds depth and makes the bats look more realistic. You can even add small details like bat wings or fangs for an extra spooky touch.
| Materials Needed | Steps |
|---|---|
|
|
Glow-in-the-dark Bats
Glow-in-the-Dark Bats add a fun and eerie element to your nails. This design uses glow-in-the-dark polish or powder to make the bats visible in the dark. It’s a great choice for Halloween parties or night events.
First, paint your nails with a dark base color. Then, use a glow-in-the-dark polish to paint bat shapes. You can also use stencils for more precision. Once the design is complete, charge the glow-in-the-dark elements under a light source. Your nails will glow beautifully in the dark, creating an eye-catching effect.
- Materials Needed:
- Dark Base Polish
- Glow-in-the-Dark Polish
- Stencils (optional)
- Steps:
- Apply the dark base color.
- Paint bats with glow-in-the-dark polish.
- Use stencils for precision.
- Charge under a light source.
Combining Bats With Other Halloween Elements
Bats make for a perfect Halloween nail art theme. They pair well with other spooky elements. This combination boosts the eerie factor of your nails.
Bats And Pumpkins
Pairing bats with pumpkins creates a classic Halloween look. Paint tiny pumpkins on your nails. Add bats flying around the pumpkins. This mix gives a balanced Halloween vibe. Use orange and black colors for an eye-catching effect.
For a unique twist, try a gradient background. Blend orange into black for a spooky sky. Add bats and pumpkins over this gradient. This design is perfect for both short and long nails.
Bats And Spider Webs
Bats and spider webs make a creepy combination. Start with a black base coat. Use white polish to draw spider webs. Add tiny bats in the web. This design looks intricate but is simple to create.
For more detail, use glitter polish on the webs. This adds a spooky sparkle to your nails. Another idea is to use 3D nail stickers. These give a realistic touch to your design.
| Combination | Colors | Details |
|---|---|---|
| Bats and Pumpkins | Orange and Black | Classic Halloween look |
| Bats and Spider Webs | Black and White | Intricate but simple |
- Use a gradient background for added effect.
- Add glitter polish for a spooky sparkle.
- 3D nail stickers give a realistic touch.
- Start with a base coat.
- Draw the main elements.
- Add details like glitter or stickers.
- Seal with a top coat.
Maintenance And Longevity Tips
Bats Nail Art can look stunning with proper care. Follow these maintenance and longevity tips to keep your nails in top shape. This guide will help you enjoy your beautiful nail art for a longer time.
Top Coats
Top coats are essential for maintaining your Bats Nail Art. They provide a protective layer that shields your nail art from damage. Apply a top coat every two days to ensure your nails stay shiny and intact.
Consider using a gel top coat for extra durability. Gel top coats last longer and provide a glossy finish. Make sure to cure the gel under a UV lamp for the best results.
| Type | Benefits |
|---|---|
| Regular Top Coat | Easy to apply, quick drying |
| Gel Top Coat | Long-lasting, extra shine |
Avoiding Chipping
Avoiding chipping can make your Bats Nail Art last longer. Here are some simple tips:
- Wear gloves while doing household chores.
- Avoid using your nails as tools.
- Reapply top coat every two days.
Chipping often occurs at the nail tips. Seal the edges with a top coat to protect them. Keep your nails dry to prevent weakening and breakage. Moisturize your cuticles regularly for healthy nail growth.
Maintaining your Bats Nail Art is easy with these tips. Your nails will stay beautiful and last longer.
Inspiration And Trends
Bats nail art is perfect for the spooky season. It’s also great for those who love dark aesthetics. This trend combines creativity with a touch of mystery. Whether you love Halloween or just unique nail designs, bat nail art offers something special. Let’s explore the latest inspiration and trends in this exciting nail art style.
Popular Bat Nail Art
Bat nail art has gained popularity. Many designs feature dark colors like black and purple. Some use glitter to add a magical touch. Below are some popular styles:
- Classic Black Bats: Simple yet elegant. Perfect for a minimalist look.
- Glittery Bats: Adds sparkle and glam to your nails.
- 3D Bat Designs: These pop off the nail for a dramatic effect.
- Bat Silhouettes: Often paired with a moon or night sky background.
These styles suit various tastes and occasions. From subtle to bold, there’s something for everyone.
Celebrity Bat Nail Designs
Many celebrities have embraced bat nail art. Their designs often set new trends. Let’s look at some notable examples:
| Celebrity | Design |
|---|---|
| Kylie Jenner | Black bats with glittering accents |
| Rihanna | 3D bat designs with dark polish |
| Billie Eilish | Neon bats on a black base |
These celebrity designs inspire many to try bat nail art. They prove that this trend is here to stay.

Credit: www.tiktok.com
Frequently Asked Questions
What Is Bats Nail Art?
Bats nail art is a nail design featuring bat shapes or motifs. It’s popular during Halloween for its spooky aesthetic.
How To Create Bats Nail Art?
To create bats nail art, use a fine brush or stencil. Paint bat shapes on your nails with black polish.
What Tools Are Needed For Bats Nail Art?
You’ll need nail polish, a fine brush, and possibly a stencil. A top coat ensures longevity.
Can Beginners Try Bats Nail Art?
Yes, beginners can try bats nail art. Start with simple bat shapes and practice for better results.
Conclusion
Bats nail art offers a fun and spooky twist for your manicure. It’s easy to create and perfect for Halloween. Experiment with different designs to showcase your creativity. Don’t forget to share your bat-themed nails on social media. Enjoy your unique and festive look!