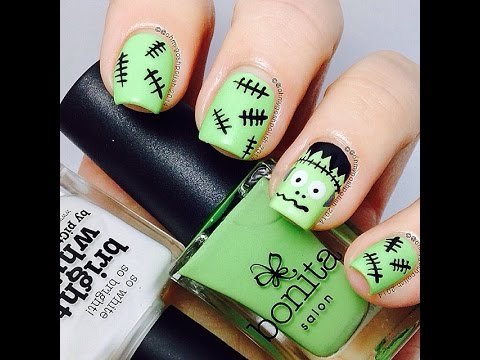
Frankenstein nail art is a creative and spooky design perfect for Halloween. It features iconic green skin, stitches, and bolts.
Frankenstein nail art combines creativity and spooky vibes, making it ideal for Halloween enthusiasts. This nail design draws inspiration from Mary Shelley’s iconic monster, featuring elements like green skin, stitches, and bolts. Nail artists can get creative with variations, using different shades of green and adding unique touches like blood splatters or lightning bolts.
Whether you’re attending a Halloween party or just love the eerie aesthetic, Frankenstein nail art is a fun way to showcase your festive spirit. Easy to achieve with basic nail tools, this design can be customized to suit individual preferences, offering a perfect blend of horror and style.
Introduction To Frankenstein Nail Art
Frankenstein Nail Art is a fun way to celebrate Halloween. This nail art trend uses the iconic look of Frankenstein’s monster. It’s perfect for adding a spooky touch to your nails.
Halloween Trend
Halloween is a time for creative costumes and spooky decorations. Nail art has become a big part of this festive season. Frankenstein Nail Art stands out because it’s unique and eye-catching.
- Easy to create
- Perfect for spooky vibes
- Works well with Halloween costumes
Why Frankenstein?
Frankenstein’s monster is a classic Halloween character. The green skin and stitches are easy to recognize. This makes it a popular choice for nail art.
Here are some reasons why people love Frankenstein Nail Art:
- Simple design with bold colors
- Iconic and easily recognizable
- Fun to create and customize
With its timeless appeal, Frankenstein Nail Art is a hit every Halloween. Try it and make your nails the talk of the party!

Credit: www.seetheworldinpink.ca
Essential Tools And Materials
Creating the perfect Frankenstein nail art requires a few essential tools and materials. With the right supplies, you can craft spooky, stylish nails that capture the Halloween spirit. Below are the key tools and materials you need to get started.
Nail Polish Colors
Choosing the right nail polish colors is crucial for Frankenstein nail art. Here is a list of must-have colors:
- Green: This is essential for Frankenstein’s skin.
- Black: Perfect for detailing and outlining.
- White: Use this for eyes and highlights.
- Red: Ideal for adding blood effects.
- Gray: Great for bolts and mechanical parts.
Special Effects Tools
Special effects tools are necessary to achieve detailed and intricate designs. Here are some of the most important tools:
| Tool | Purpose |
|---|---|
| Detail Brush | For creating fine lines and details. |
| Dotting Tool | To make perfect dots and eyes. |
| Striping Tape | Helpful for making straight lines. |
| Sponges | For creating gradient effects. |
With these essential tools and materials, you can create stunning Frankenstein nail art. Enjoy experimenting with different designs and colors.
Preparing Your Nails
Before creating your spooky Frankenstein nail art, prepare your nails. This step ensures your design looks clean and lasts longer.
Cleaning And Shaping
First, clean your nails thoroughly. Use a gentle nail polish remover to wipe away any old polish. Then, wash your hands with soap and water. Dry your hands well.
Next, shape your nails. Use a nail file to smooth the edges. Shape them in a way that suits your design. Rounded or squared shapes work best for Frankenstein nail art.
Push back your cuticles with a cuticle pusher. This helps the polish stay longer. Trim any hangnails carefully. Your nails are now clean and shaped, ready for the next step.
Base Coat Application
Applying a base coat is crucial. It protects your nails from staining. It also helps the polish stick better.
Choose a good-quality base coat. Apply a thin layer to each nail. Let the base coat dry completely. This may take a few minutes. Be patient; this step is important for a smooth finish.
With your nails clean, shaped, and coated, you are ready for the exciting part. Create your Frankenstein nail art on a perfect canvas.
| Step | Action |
|---|---|
| 1 | Clean your nails |
| 2 | Shape your nails |
| 3 | Push back cuticles |
| 4 | Apply base coat |
| 5 | Let base coat dry |
Simple Frankenstein Designs
Are you a fan of spooky nail art? Simple Frankenstein Designs are easy and fun. These designs are perfect for Halloween. You don’t need to be an artist. Just follow these easy steps.
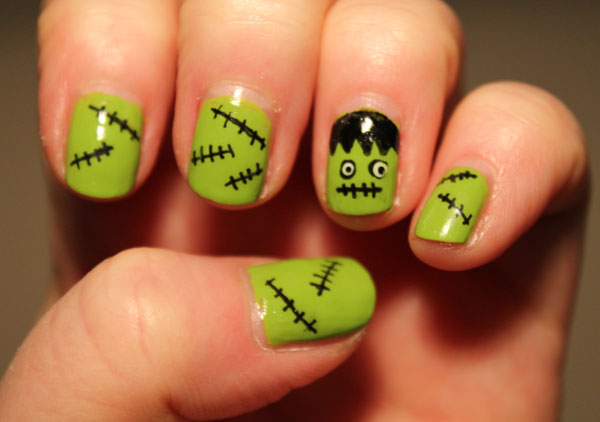
Basic Green Monster
The Basic Green Monster design is very popular. Start with a green base coat. This is Frankenstein’s skin color.
- Apply a green nail polish.
- Let it dry completely.
Next, add Frankenstein’s facial features. Use a thin brush or a nail art pen.
- Draw two small black dots for eyes.
- Add a stitched smile using black polish.
- Finish with a top coat to seal your design.
Stitch Patterns
Stitch Patterns make your nails look extra spooky. They are easy to create.
Start with a white or light grey base coat.
- Apply the base color and let it dry.
Now, draw stitches using a black nail art pen.
- Draw horizontal lines across your nail.
- Add small vertical lines over the horizontal ones.
- Finish with a top coat for a glossy look.
These simple Frankenstein designs are perfect for beginners. Try them out and enjoy your spooky nails!
Advanced Frankenstein Designs
Frankenstein nail art has become a popular trend for Halloween and beyond. For those wanting to take their designs to the next level, advanced techniques offer a unique twist. Below, explore some impressive advanced Frankenstein designs.
3d Effects
3D effects add depth and realism to your Frankenstein nail art. Use acrylics or gels to create raised scars and stitches. You can also add tiny bolts or screws for an authentic Frankenstein look.
Consider using small bits of wire to mimic Frankenstein’s neck bolts. These details make your nails stand out. Choose contrasting colors to highlight the 3D elements.
Here’s a quick guide on how to achieve 3D effects:
- Apply a base coat and let it dry completely.
- Use a thin brush to outline the 3D elements.
- Fill in the outlines with acrylic or gel.
- Use a curing lamp to set the acrylic or gel.
- Finish with a top coat for extra durability.
Glow-in-the-dark
Glow-in-the-dark nail polish adds a spooky touch to Frankenstein designs. This effect is perfect for Halloween parties or nighttime events. Apply a glowing base coat before adding your Frankenstein details.
Use glow-in-the-dark paint for features like stitches and scars. This creates a haunting effect in low light. You can also mix glow-in-the-dark powder with clear polish for a custom glow.
Follow these steps for a glowing effect:
- Apply a glow-in-the-dark base coat and let it dry.
- Use black polish to paint Frankenstein’s face and features.
- Highlight the stitches and scars with glow-in-the-dark paint.
- Let everything dry completely.
- Seal with a top coat for a lasting finish.
Combining these advanced techniques ensures your Frankenstein nail art is both unique and impressive.
Nail Art Techniques
Ready to dive into the world of Frankenstein Nail Art? This section will cover various nail art techniques to create those spooky and fun designs. Whether you prefer the precision of stamping or the creativity of freehand drawing, there’s a method for everyone.
Stamping
Stamping is a popular technique for quick and precise nail art. It uses pre-designed plates and a stamper to transfer designs onto your nails. Here’s a simple guide to stamping:
- Choose a stamping plate with Frankenstein or Halloween designs.
- Apply a thick layer of stamping polish on the design.
- Scrape off the excess polish with a scraper.
- Use the stamper to pick up the design.
- Roll the stamper over your nail to transfer the design.
- Seal with a top coat for a long-lasting finish.
Freehand Drawing
For those who love to draw, freehand drawing offers endless possibilities. You can create unique and personalized Frankenstein designs with just a few tools:
- Fine-tip nail art brushes
- Nail polish or acrylic paint in desired colors
- A dotting tool for precise details
Follow these steps to create your own Frankenstein masterpiece:
- Start with a base coat to protect your nails.
- Apply a base color, such as green, for Frankenstein’s skin.
- Use a fine-tip brush to outline Frankenstein’s face.
- Fill in the details like eyes, stitches, and bolts.
- Allow each layer to dry before adding more details.
- Finish with a top coat to protect your artwork.
Both techniques offer unique ways to achieve stunning Frankenstein nail art. Whether you choose stamping or freehand drawing, you’ll have spooky nails ready for any Halloween celebration.
Maintenance Tips
Ensuring your Frankenstein nail art stays fresh and fabulous is easy. Follow these simple tips to keep your spooky design looking its best.
Protecting Your Design
To protect your Frankenstein nail art, apply a top coat every two days. This will seal the design and prevent chipping. Avoid using your nails as tools. This can damage the art. Wear gloves when doing chores. This helps avoid exposure to harsh chemicals.
Touch-up Methods
If your nail art chips, you can touch it up easily. Use a fine brush and matching polish to fill in the gaps. Blend the edges carefully to avoid noticeable lines. Apply a fresh top coat after touching up. This will help everything blend smoothly.
Credit: www.biggirlblue.com
Showcasing Your Nail Art
You’ve mastered the art of Frankenstein nail designs. Now, it’s time to showcase your spooky creations. Sharing your nail art can inspire others and get you noticed. Let’s explore some fun ways to display your nail art.
Social Media Sharing
Social media is a powerful tool for showcasing your nail art. Platforms like Instagram and Pinterest are perfect for sharing your designs. Use these tips to make your posts stand out:
- High-quality photos: Use good lighting and a clean background.
- Hashtags: Use relevant hashtags like #FrankensteinNails and #HalloweenNailArt.
- Engage: Comment on and like posts from other nail art enthusiasts.
Create a step-by-step photo series. This shows how you achieved your Frankenstein nails. People love seeing the process. You can even make short video tutorials. Share these on platforms like TikTok and YouTube.
Halloween Parties
Halloween parties are a great place to show off your nail art. Your Frankenstein nails will be a hit. They can even spark conversations. Follow these tips to ensure your nails get noticed:
- Coordinate with your costume: Match your nails with your Halloween outfit.
- Be confident: Show your nails to friends and party guests.
- Take photos: Capture your nails in party settings and share online.
Consider organizing a Halloween nail art contest. Invite friends to create their own designs. This can be a fun way to celebrate and share your passion for nail art.
| Platform | Tips |
|---|---|
| Use stories and reels for more engagement. | |
| Pin your designs to themed boards. | |
| Share in nail art groups and pages. |
Remember to enjoy the process. Showing your nail art can be just as fun as creating it. Happy showcasing!

Credit: www.pinterest.com
Frequently Asked Questions
What Is Frankenstein Nail Art?
Frankenstein nail art is a Halloween-themed design inspired by the Frankenstein monster. It often features green skin, stitches, and bolts.
How To Do Frankenstein Nail Art At Home?
To create Frankenstein nail art, use green nail polish as a base. Add black stitches and white bolts using a fine nail brush.
What Tools Are Needed For Frankenstein Nail Art?
You’ll need green, black, and white nail polish. Also, a fine nail brush or nail art pen is essential.
Can Beginners Try Frankenstein Nail Art?
Yes, beginners can try Frankenstein nail art. Start with simple designs and practice to improve your skills.
Conclusion
Transform your nails with Frankenstein nail art this Halloween. Embrace creativity and turn heads with spooky designs. Gather your tools, follow our steps, and let your imagination run wild. Share your creations on social media and inspire others. Dive into the world of nail art and enjoy the thrill of Halloween.