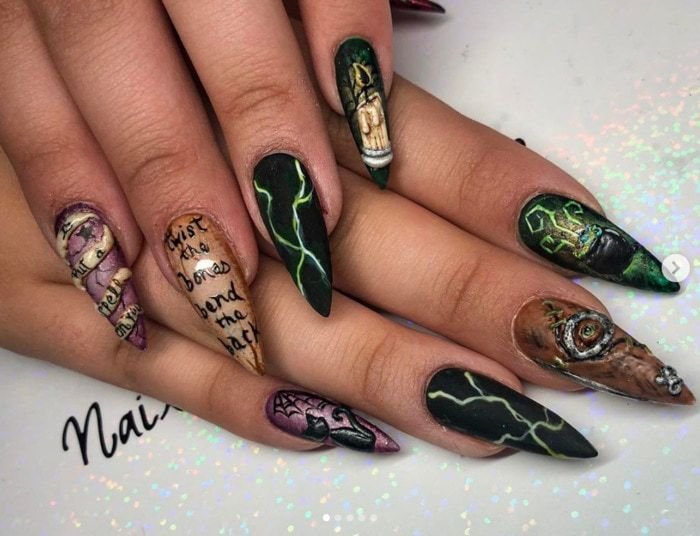
Hocus Pocus Nail Art features magical designs inspired by the popular Halloween movie. These nail designs showcase spooky and enchanting elements.
Hocus Pocus Nail Art offers a creative way to celebrate Halloween with enchanting and spooky designs inspired by the beloved movie. Nail artists use vibrant colors and intricate patterns to bring scenes and characters from “Hocus Pocus” to life on your nails.
This nail art style is perfect for fans of the movie who want to add a touch of magic to their Halloween look. It’s also a great conversation starter and can make any Halloween outfit stand out. Whether you choose a full set or just an accent nail, Hocus Pocus Nail Art will captivate and charm everyone who sees it.

Credit: m.youtube.com
Introduction To Hocus Pocus Nail Art
Hocus Pocus Nail Art is magical and fun. It brings the Halloween spirit to your fingertips. Inspired by the classic movie, it’s perfect for spooky celebrations.
This nail art style is both enchanting and easy to achieve. From witches to spells, it captures the essence of Halloween. Ready to dive into this bewitching trend?
Why Choose Halloween Nail Art?
Halloween nail art is unique and festive. It adds an extra touch to your costume. You can show off your creativity through your nails.
| Reasons | Benefits |
|---|---|
| Festive Look | Makes you stand out |
| Creative Expression | Show your personality |
| Fun Activity | Enjoy doing it with friends |
Inspiration From Hocus Pocus
Hocus Pocus characters inspire many nail art designs. Winifred, Sarah, and Mary Sanderson bring magic to your nails. Their costumes and colors offer endless design ideas.
- Winifred’s Green: Use green nail polish and add witchy details.
- Sarah’s Purple: Purple nails with spooky symbols.
- Mary’s Red: Red nails with black accents for a witchy look.
Try adding tiny brooms, cauldrons, or spell books. These details make your nails look magical. Your nails will be a hit at any Halloween party!
Essential Tools And Materials
Creating stunning Hocus Pocus nail art requires the right tools and materials. With the right essentials, you can craft magical designs that mesmerize. Let’s explore the must-have tools and materials for bewitching nail art.
Nail Polishes And Brushes
High-quality nail polishes are essential for vibrant Hocus Pocus nail art. You need a variety of colors to capture the mystical theme. Here are some must-have shades:
- Black
- Purple
- Green
- Gold
- Glitter
Specialized nail brushes also play a crucial role. Different brush types help you achieve detailed designs. Essential brushes include:
| Brush Type | Use |
|---|---|
| Detail Brush | For fine lines and intricate designs |
| Striping Brush | For long, straight lines |
| Fan Brush | For gradient effects and blending |
Decorative Add-ons
Decorative add-ons elevate your Hocus Pocus nail art. They add sparkle and depth. Popular add-ons include:
- Stickers: Easy to apply and come in various spooky designs.
- Rhinestones: Add sparkle and a 3D effect.
- Glitter: Perfect for adding shimmer and shine.
- Foil: Creates a metallic, magical look.
- Stamps: Great for repeating patterns and symbols.
Stickers and stamps save time while ensuring precision. Rhinestones and glitter add a touch of luxury and magic. Foil can give your nails a unique, enchanting look.
Preparing Your Nails
Before diving into the magical world of Hocus Pocus Nail Art, it’s essential to prepare your nails properly. This ensures a smooth application and longer-lasting results. Let’s go through the steps of preparing your nails to get the perfect base for your enchanting designs.
Cleaning And Shaping
Start by cleaning your nails thoroughly. Remove any old nail polish using a non-acetone remover. Wash your hands with soap and water to remove any residue. Clean nails provide a better surface for new polish to adhere.
Next, shape your nails using a nail file. File in one direction to avoid splitting. Choose a shape that suits your style, whether it’s round, square, or almond. Smooth out any rough edges with a buffer.
| Steps | Details |
|---|---|
| Remove Old Polish | Use non-acetone remover |
| Wash Hands | Use soap and water |
| Shape Nails | File in one direction |
| Smooth Edges | Use a buffer |
Applying Base Coat
Applying a base coat is crucial for a smooth finish. A base coat protects your natural nails from staining and provides a smooth surface for the polish. It also helps the nail polish adhere better and last longer.
Here are the steps to apply a base coat:
- Choose a high-quality base coat.
- Apply a thin layer to each nail.
- Allow it to dry completely before applying nail polish.
A good base coat sets the stage for your stunning Hocus Pocus Nail Art. Once your base coat is dry, you’re ready to create your magical designs.

Credit: www.youtube.com
Classic Witchy Designs
Classic witchy designs capture the spooky spirit of Halloween. They are perfect for Hocus Pocus nail art. These designs bring magic and mystery to your fingertips. Let’s explore some enchanting ideas.
Witch Hats And Brooms
Witch hats and brooms are iconic symbols of witchcraft. They make fantastic nail art designs. Here’s how you can create them:
- Witch Hats: Use black polish to paint a small triangle. Add a thin band in a contrasting color.
- Brooms: Paint the base of the nail brown. Add thin lines to create the broomstick. Use lighter shades for the bristles.
Cauldrons And Potions
Cauldrons and potions add a magical touch to your nails. These designs are fun and easy to create.
- Cauldrons: Draw a small black circle at the center. Add tiny bubbles around it using white or green polish.
- Potions: Paint small bottle shapes in different colors. Add a sparkle effect with glitter polish.
| Design | Colors | Details |
|---|---|---|
| Witch Hats | Black, White | Triangular shape with a band |
| Brooms | Brown, Light Brown | Long stick with bristles |
| Cauldrons | Black, Green | Circle with bubbles |
| Potions | Various colors | Small bottles with sparkles |
Spooky Characters
Get ready to dive into the magical world of Hocus Pocus nail art. This section focuses on spooky characters that you can bring to life on your nails. From the iconic Sanderson Sisters to eerie black cats and bats, discover how to add these enchanting figures to your nail designs.
Sanderson Sisters
The Sanderson Sisters are the heart of Hocus Pocus. Create their quirky looks on your nails. Use vibrant colors for each sister:
- Winifred Sanderson: Green dress, red hair, and a mischievous smile.
- Sarah Sanderson: Purple dress, blonde hair, and a playful expression.
- Mary Sanderson: Red dress, dark hair, and a comical grin.
Use tiny brushes for detailed work. Seal your art with a glossy top coat.
Black Cats And Bats
Black cats and bats add a spooky flair to your nails. Use a black base coat for a dramatic effect. Add these elements:
| Character | Details |
|---|---|
| Black Cats | Green eyes, sharp ears, and a curled tail. |
| Bats | Spread wings, tiny fangs, and eerie eyes. |
For extra sparkle, add some glitter polish. This enhances the spooky look.
Enchanting Patterns
Hocus Pocus nail art is perfect for Halloween. It features enchanting patterns that captivate everyone. These designs transform your nails into magical works of art. Let’s explore some of these spellbinding patterns.
Spider Webs And Ghosts
Spider webs are a classic choice for Hocus Pocus nail art. They add an eerie touch that fits the Halloween vibe. Ghosts are another popular design. They can be cute or spooky, depending on your style.
| Pattern | Color Suggestions |
|---|---|
| Spider Webs | Black, White, Silver |
| Ghosts | White, Black, Glow-in-the-dark |
Mystical Symbols
Mystical symbols make your nails look magical. Stars, moons, and pentagrams are popular choices. These symbols can be simple or intricate, adding a touch of mystery.
- Stars: Add a celestial feel.
- Moons: Perfect for a mystical look.
- Pentagrams: Bold and enchanting.
Choose colors that enhance these mystical symbols. Dark shades like black and purple work well. Add glitter for extra sparkle.
Adding Special Effects
Adding special effects to your Hocus Pocus nail art can elevate your look. These effects make your nails stand out and grab attention. Here are some magical ideas to try.
Glow In The Dark
Make your nails glow in the dark for a spooky effect. Use special glow-in-the-dark nail polish. Apply a base coat first to protect your nails. Next, paint your nails with two coats of the glow polish. Let each coat dry completely. This will ensure the best glow effect.
Charge your nails under bright light for a few minutes. They will then glow in the dark. This is perfect for Halloween parties or nighttime events. You can also add small glow-in-the-dark stickers. These can include stars, moons, or other spooky shapes. Place them on your nails before the polish dries.
3d Elements
Add 3D elements to give your nails a unique look. Use small gems, beads, or tiny charms. These can be glued onto your nails for a raised effect. Make sure to use nail glue for a strong hold.
You can create a 3D spider web using thin, black nail art tape. Cut small pieces and arrange them in a web pattern. Press them down firmly to stick. Another idea is to use small, 3D stickers. These can include pumpkins, bats, or witches’ hats. Place them on your nails and seal with a top coat.
| Special Effect | Materials Needed | Steps |
|---|---|---|
| Glow in the Dark | Glow-in-the-dark polish, base coat, stickers |
|
| 3D Elements | Gems, beads, charms, nail glue, 3D stickers |
|
Finishing Touches
After creating your stunning Hocus Pocus nail art, the finishing touches are crucial. These steps ensure your designs last longer and look even more magical. Let’s dive into the essential finishing touches for your spellbinding nails.
Top Coats For Durability
The top coat is like a shield for your nail art. It protects your designs from chipping and adds a beautiful shine. Here are some top coats to consider:
| Top Coat | Benefits |
|---|---|
| Seche Vite | Quick-drying and long-lasting |
| Sally Hansen Miracle Gel | Gel-like finish without UV light |
| Essie Gel Couture | High gloss and easy to apply |
Nail Care Tips
Taking care of your nails keeps them healthy and strong. Follow these simple tips to maintain your Hocus Pocus nail art:
- Moisturize your cuticles daily.
- Avoid using your nails as tools.
- Wear gloves when doing household chores.
- Trim and file your nails regularly.
By following these tips, your nails will stay in top shape. Enjoy your magical Hocus Pocus nail art for longer!

Credit: www.pinterest.com
Frequently Asked Questions
What Is Hocus Pocus Nail Art?
Hocus Pocus Nail Art is a whimsical and magical nail design inspired by the movie “Hocus Pocus. ” It features vibrant colors, glitter, and mystical elements like witches and spells.
How To Create Hocus Pocus Nail Art?
Start with a base color, add Halloween-themed decals, and finish with glitter. Use nail art brushes for details.
What Tools Are Needed For Hocus Pocus Nail Art?
You need nail polish, nail art brushes, decals, and a top coat. Glitter and rhinestones add extra flair.
Can Beginners Do Hocus Pocus Nail Art?
Yes, beginners can try simple designs using decals and stickers. Advanced designs require more practice and tools.
Conclusion
Creating Hocus Pocus nail art can add a magical touch to your style. It’s fun and easy to try. With these tips, your nails will look bewitching. Unleash your creativity and let your nails tell a spooky story. Dive into the world of nail art and enchant everyone around you.