Mummy nail art features spooky, wrapped designs resembling mummies, perfect for Halloween. It’s a fun and creative way to celebrate.
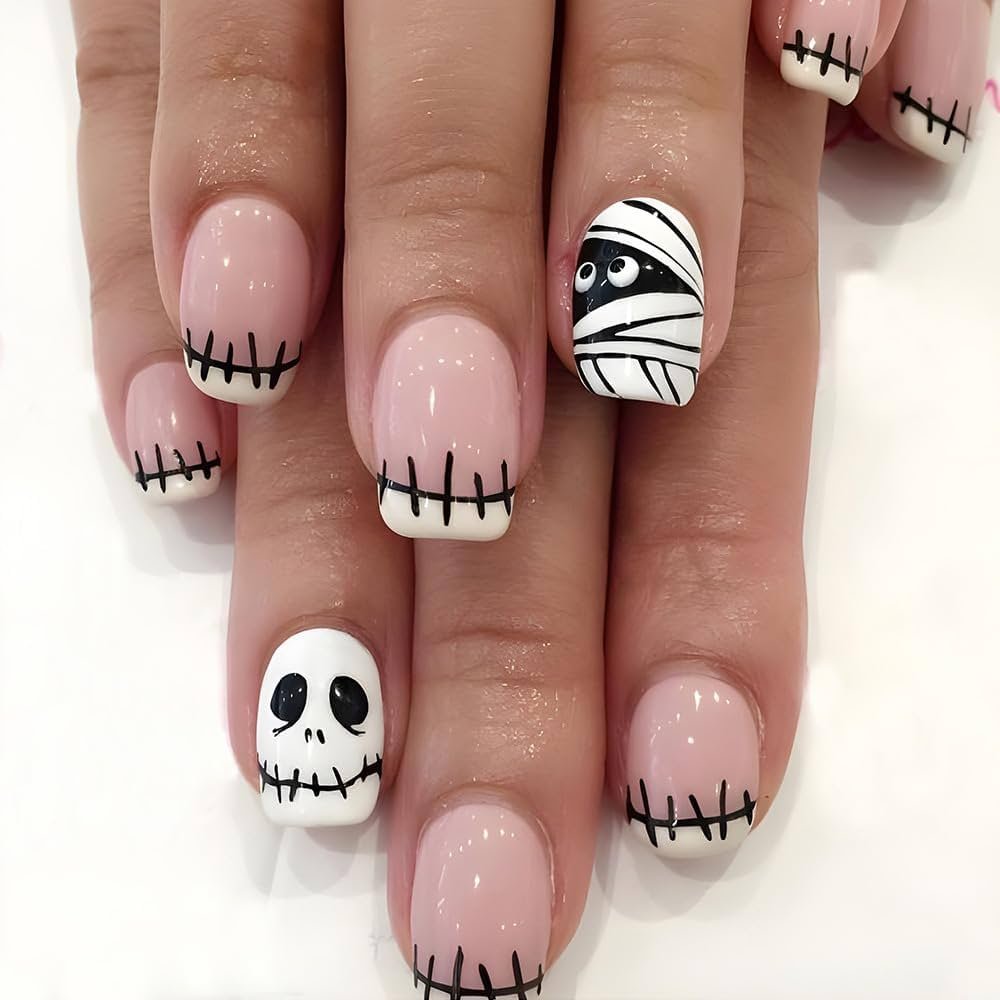
Mummy nail art has become a popular choice for Halloween enthusiasts. This design typically includes white or beige base colors with black lines mimicking mummy wraps. Some variations add eyes or other spooky elements for extra flair. The beauty of mummy nail art lies in its simplicity and versatility.
Anyone can create this look at home with basic tools. It suits various nail lengths and shapes, making it accessible to all. Whether attending a Halloween party or just in the festive spirit, mummy nail art adds a touch of fun to your look.
Essential Tools
Creating stunning mummy nail art requires the right tools. These tools help achieve precise and creative designs. Here’s a list of essential tools you need to get started.
Nail Polishes
Nail polishes are the base of any nail art design. For mummy nail art, you need a few key colors:
- White polish for the mummy’s bandages.
- Black polish to outline the design.
- Red polish for eerie blood effects.
- Beige polish for a decayed look.
These colors will help you create a spooky mummy effect. Ensure you have quality polishes for a long-lasting design.
Nail Art Brushes
Nail art brushes are essential for detailed designs. Different brushes serve different purposes:
| Brush Type | Use |
|---|---|
| Detail Brush | Fine lines and intricate details |
| Striping Brush | Long, straight lines |
| Flat Brush | Filling in larger areas |
Having a variety of brushes ensures versatility in your designs. Clean your brushes after each use to maintain their quality.
Other Tools
Other tools are also important for mummy nail art:
- Dotting tools for creating eyes and other round shapes.
- Striping tape to create bandage lines.
- Top coat to seal the design and add shine.
- Base coat to protect your natural nails.
These tools help you achieve a professional look. Ensure your top and base coats are of high quality for the best results.
Basic Mummy Nail Design
The Basic Mummy Nail Design is a fun and spooky way to celebrate Halloween. This nail art is simple, yet effective, making it perfect for both beginners and experienced nail artists. With a few basic tools and some white polish, you can create a mummy look that will impress everyone.
Step-by-step Guide
- Prepare your nails: Clean and file your nails.
- Apply a base coat: This protects your nails.
- Paint your nails white: Use two coats for opacity.
- Draw mummy bandages: Use a thin black brush.
- Add eyes: Use a dotting tool to make two small dots.
- Seal with top coat: Ensure your design lasts longer.
Tips For Beginners
- Practice on paper: Before trying on your nails, practice on paper.
- Use tape: For straight bandages, use thin strips of tape.
- Keep it simple: Start with fewer bandages and add more as you get comfortable.
- Be patient: Let each layer dry completely to avoid smudging.
Advanced Mummy Nail Techniques
Are you ready to take your mummy nail art to the next level? Advanced techniques can transform your nails into spooky masterpieces. From incorporating 3D elements to using glow-in-the-dark polish, these methods will make your nails stand out.
Incorporating 3d Elements
Adding 3D elements can make your mummy nails pop. Use tiny gauze strips to create a realistic mummy wrap. Attach these strips with nail glue for a secure hold. You can also use small plastic eyes for a spooky touch. Place the eyes strategically to give your mummy a life-like appearance.
For extra detail, consider adding tiny spiders or webs. These can be made from nail art materials or bought as ready-made accessories. Here’s a quick list of materials you’ll need:
- Gauze strips
- Nail glue
- Plastic eyes
- Spider accessories
Using Glow-in-the-dark Polish
Glow-in-the-dark polish adds a magical touch to your mummy nails. Apply a base coat before using the glow polish. This ensures a smooth application. After the base coat dries, apply two layers of glow-in-the-dark polish.
For an extra spooky effect, use glow polish for the mummy’s eyes. You can also add glow lines to the gauze strips. This will make your nails shine in the dark, adding an eerie effect.
Here are the steps for using glow-in-the-dark polish:
- Apply a base coat.
- Let it dry completely.
- Apply two layers of glow polish.
- Add glow details to the eyes and gauze strips.
These advanced techniques will elevate your mummy nail art. Experiment with both 3D elements and glow polish for a unique look.
Creative Variations
Elevate your mummy nail art with creative twists. Enhance your spooky nails with unique designs. Explore the following variations.
Mummy And Tombstones
Combine mummy nails with tombstone designs. Create a spooky cemetery scene on your nails. Here are some ideas:
- Draw tiny tombstones alongside mummy wraps.
- Use gray and black colors for tombstones.
- Add RIP inscriptions for a realistic touch.
| Item | Suggested Colors | Details |
|---|---|---|
| Mummy Wraps | White, Beige | Use thin lines for wraps. |
| Tombstones | Gray, Black | Draw small tombstones on each nail. |
| Inscriptions | Black | Add RIP for realism. |
Mummy And Spiders
Pair mummy nails with creepy spiders. Create a haunted look with these ideas:
- Draw small spiders crawling on the mummy wraps.
- Use black polish for spiders.
- Add red dots for spider eyes.
These small details make your nails stand out. Have fun experimenting!
Color Schemes
Mummy nail art is a fun and spooky way to celebrate Halloween. The right color schemes can make your mummy nails stand out. From classic to modern, the choices are endless.
Traditional Black And White
The traditional black and white color scheme is a classic. It captures the eerie and timeless look of mummies. Use white polish as your base. Then, add black lines for the wrapping effect. This gives a simple yet spooky look. Black and white always make a bold statement. You can also add googly eyes for a fun twist. This makes your mummy nails look alive!
Bold And Bright Colors
Why not try something different? Bold and bright colors can make your mummy nails pop. Neon green, bright purple, or electric blue can be exciting choices. Start with a bright base color. Then, use black or white for the mummy wraps. This contrast makes the design stand out. You can even mix and match colors for a unique look. This is great for kids and adults who love vibrant nails.
Here’s a quick comparison of the two color schemes:
| Color Scheme | Base Color | Wrap Color | Effect |
|---|---|---|---|
| Traditional Black and White | White | Black | Classic, Spooky |
| Bold and Bright Colors | Bright Colors (e.g., Neon Green) | Black or White | Fun, Eye-catching |
Both color schemes have their charm. Choose the one that suits your style. Happy painting!

Credit: www.instagram.com
Maintenance Tips
Once you’ve achieved that perfect mummy nail art, keeping it fresh and intact is essential. By following a few maintenance tips, you can ensure your design remains flawless for days. Below are some practical tips to help you maintain your mummy nail art.
Keeping Your Design Intact
Protecting your mummy nail art from damage starts with some simple steps:
- Apply a clear top coat every two days.
- Wear gloves when doing household chores.
- Avoid using your nails as tools.
- Keep your nails short to prevent breaks.
Follow these steps to keep your mummy nail art looking fresh and vibrant.
Quick Fixes For Chips
Chips can happen, but there are quick fixes to restore your mummy nail art:
- Clean the chipped area with nail polish remover.
- Apply a thin layer of matching nail polish.
- Let it dry completely.
- Add a clear top coat to seal the repair.
For small chips, use a fine brush to touch up the design. Keep a matching nail polish in your bag for on-the-go fixes.
With these simple maintenance tips, your mummy nail art can stay stunning and last longer.
Showcasing Your Mummy Nails
You’ve created the perfect mummy nail art. Now, it’s time to show them off! Whether you’re sharing on social media or attending Halloween parties, here are some tips to make your mummy nails shine.
Social Media Tips
Sharing your mummy nails on social media can be fun. Follow these tips:
- Use good lighting: Bright light shows details.
- Choose a clean background: It makes your nails pop.
- Add hashtags: Use #MummyNails, #HalloweenNails, and #NailArt.
- Engage with followers: Reply to comments and messages.
Using these tips, your mummy nails will get the attention they deserve.
Halloween Parties
Halloween parties are the best time to showcase your mummy nails. Here are some ideas:
- Match with your costume: Wear a mummy costume for a complete look.
- Show off with hand gestures: Use your hands while talking.
- Take part in nail art contests: Many parties have contests with prizes.
By following these ideas, your mummy nails will be the star of the party.

Credit: www.ebay.com

Credit: www.thelittlecanvas.com
Frequently Asked Questions
What Is Mummy Nail Art?
Mummy nail art is a Halloween-themed nail design. It mimics the look of a mummy’s bandages. This design is fun and festive.
How Do You Create Mummy Nail Art?
Start with a base coat. Apply white polish and let it dry. Use black polish to create bandage-like lines. Add eyes for a spooky effect.
What Tools Are Needed For Mummy Nail Art?
You’ll need white and black nail polish, a thin nail brush, and a dotting tool. A base coat and top coat are also essential.
Can Beginners Try Mummy Nail Art?
Yes, beginners can easily try mummy nail art. It requires simple tools and basic techniques. It’s perfect for Halloween.
Conclusion
Mummy nail art is a fun way to embrace the spooky season. It’s easy, creative, and perfect for Halloween. Try different designs and colors to match your style. With mummy nail art, your nails will be the highlight of any Halloween party.
Enjoy experimenting and have a spook-tacular time!