Nightmare Before Christmas nail art features iconic characters and spooky designs. It’s perfect for fans of the movie and Halloween enthusiasts.
Nightmare Before Christmas nail art captures the essence of Tim Burton’s beloved film. This nail art trend includes Jack Skellington, Sally, and other iconic characters. Fans can showcase their love for the movie and embrace a spooky aesthetic. This design trend is popular around Halloween but can be worn year-round.
It combines dark, whimsical elements with intricate details. The nail art can be customized with different colors and patterns. It’s a creative way to express individuality and fandom. Nail artists and DIY enthusiasts alike enjoy experimenting with these designs. Nightmare Before Christmas nail art remains a timeless favorite.

Credit: www.reddit.com
Introduction To Nightmare Before Christmas Nail Art
Welcome to the magical world of Nightmare Before Christmas Nail Art. This unique nail art theme brings the beloved characters and spooky charm of Tim Burton’s classic movie to your fingertips. Whether you’re a nail art newbie or a seasoned pro, you’ll find inspiration and joy in these creative designs.
Why Choose This Theme
The Nightmare Before Christmas theme is perfect for nail art lovers. Here are a few reasons why:
- Timeless Appeal: The movie remains a favorite for all ages.
- Unique Designs: The characters offer endless creative possibilities.
- Seasonal Versatility: Suitable for both Halloween and Christmas.
Popular Characters And Elements
Bring your nails to life with these popular characters and elements:
| Character/Element | Description |
|---|---|
| Jack Skellington | The Pumpkin King, known for his iconic grin. |
| Sally | Jack’s love interest, with her stitched-up look. |
| Zero | Jack’s ghost dog, often depicted with a glowing nose. |
| Oogie Boogie | The villain, known for his burlap sack appearance. |
| Spiral Hill | The iconic twisted hill, perfect for nail backgrounds. |
These characters and elements can be mixed and matched. Create designs that are spooky, cute, or somewhere in between. The possibilities are endless!

Credit: www.amazon.com
Essential Tools And Materials
Creating stunning Nightmare Before Christmas nail art requires the right tools. This guide covers all the essentials. From basic supplies to specialty items, get ready to craft spooky designs.
Basic Nail Art Supplies
Start with the basic nail art supplies. These are the foundation of your spooky designs.
- Nail Polish: Get black, white, and purple colors.
- Nail Brushes: Thin brushes for detail work.
- Top Coat: A clear top coat for a shiny finish.
- Base Coat: Protects your nails and makes polish last longer.
- Dotting Tools: Perfect for creating eyes and other small details.
- Acetone: Clean up any mistakes with ease.
Specialty Items For Spooky Designs
For a truly spooky look, you’ll need some specialty items. These tools add the special touch to your Nightmare Before Christmas nail art.
- Glow-in-the-Dark Polish: Make your designs glow in the dark.
- Nail Stickers: Find stickers with spooky designs.
- Stamping Plates: Use plates with Halloween themes.
- Fine Glitter: Add sparkle to your nails.
- Nail Art Pens: Draw intricate designs with ease.
With these tools, you can create amazing nail art. Start with the basics and add specialty items for a unique touch.
Preparation And Base Coats
Creating stunning Nightmare Before Christmas nail art starts with proper preparation and base coats. These steps ensure your designs last longer and look professional. Follow these guidelines to achieve the perfect base for your spooky masterpiece.
Nail Prep Steps
Preparing your nails is a crucial first step. Follow these simple steps:
- Clean your nails: Remove old polish using acetone or nail polish remover.
- Shape your nails: Use a nail file to shape your nails as desired.
- Trim cuticles: Gently push back and trim excess cuticles using a cuticle pusher and nippers.
- Buff the surface: Lightly buff your nails to remove any ridges and create a smooth surface.
- Wash and dry: Wash your hands to remove dust and oils, then dry thoroughly.
Choosing The Right Base Coat
The right base coat can make a big difference in your nail art’s longevity. Here’s what to consider:
| Type of Base Coat | Benefits |
|---|---|
| Clear Base Coat | Protects nails from staining and ensures polish adherence. |
| Ridge-Filling Base Coat | Fills in ridges, creating a smooth canvas for nail art. |
| Strengthening Base Coat | Fortifies weak nails and prevents breakage. |
Apply the base coat in thin, even layers. Let each layer dry completely before proceeding to the next step.
Jack Skellington Nail Designs
Jack Skellington, the iconic character from “The Nightmare Before Christmas”, is a favorite for nail art enthusiasts. His spooky and charming face can be seen in many nail designs. Below, explore different Jack Skellington nail designs that you can try.
Simple Jack Faces
For a straightforward look, go with simple Jack faces. This design is easy yet striking. Here’s how you can achieve it:
- Base Coat: Apply a clear base coat to protect nails.
- White Base: Paint nails with white polish.
- Black Details: Use a thin brush to draw Jack’s eyes, nose, and mouth with black polish.
- Top Coat: Seal the design with a clear top coat.
This design is perfect for beginners. It captures Jack’s essence with minimal effort.
Detailed Portraits
For those who want a challenge, try detailed portraits. These designs require precision and patience. Here are the steps:
- Base Coat: Start with a clear base coat.
- Color Base: Choose a dark or neutral background color.
- Sketch Outline: Use a fine brush to sketch Jack’s outline in white.
- Fill Details: Fill in Jack’s face and add shadows with black polish.
- Highlight: Add highlights with silver or white polish for depth.
- Top Coat: Finish with a clear top coat to protect the art.
Detailed portraits are ideal for nail artists who love intricate designs. These designs showcase Jack Skellington in all his glory.
Whether you choose simple Jack faces or detailed portraits, Jack Skellington nail designs will make your nails stand out.
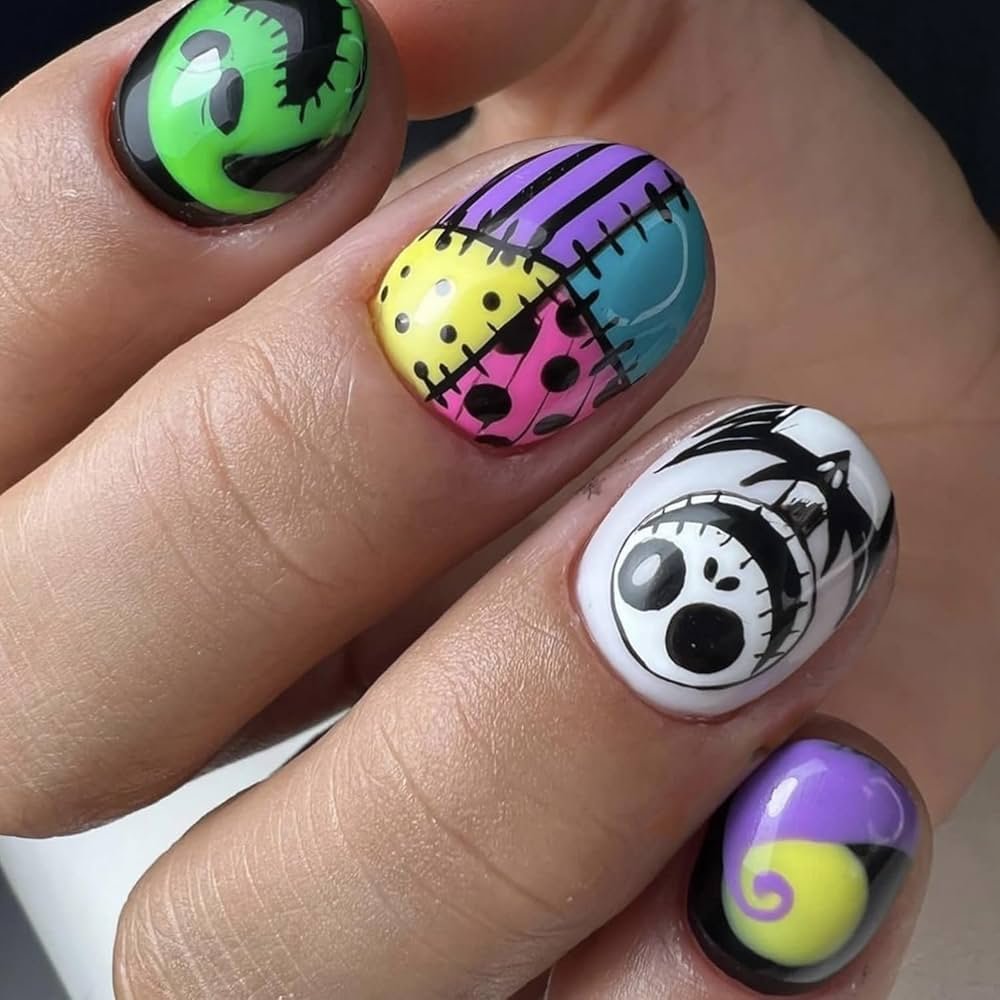
Sally-inspired Patterns
Sally from The Nightmare Before Christmas has a unique style. Her patchwork dress and colorful look inspire creative nail art designs. Sally-inspired patterns can add a spooky yet charming touch to your nails.
Patchwork Nails
Create patchwork nails by mimicking Sally’s dress. Use different colors and patterns. Start with a base coat of white or nude polish. This helps the colors pop.
Next, paint small patches of different colors on each nail. Use a thin brush for neat edges. Think about using colors like blue, red, and yellow. Add stitches using a black nail art pen or brush. Draw small, dashed lines to connect the patches.
| Color | Pattern |
|---|---|
| Blue | Stripes |
| Red | Polka Dots |
| Yellow | Checks |
Color Palette Tips
Choosing the right colors is key. Sally’s dress has a mix of bold and muted tones. Consider using a mix of the following colors:
- Blue: For a calm and cool patch.
- Red: To add a vibrant touch.
- Yellow: To brighten the overall look.
- Black: For stitches and outlines.
Use a color wheel to find complementary colors. This helps your nails look balanced. You can also add a touch of glitter for some sparkle.
- Start with a base coat.
- Paint different patches on each nail.
- Add stitches with a black pen.
- Finish with a top coat.
Now, your Sally-inspired nails are ready. Show off your Halloween spirit with this unique nail art!
Oogie Boogie And Other Villains
Are you a fan of Nightmare Before Christmas? Do you love villains? This blog post is perfect for you! Let’s explore some amazing nail art ideas. We will focus on Oogie Boogie and other villains. Get ready for some spooky inspiration!
Oogie Boogie Designs
Oogie Boogie is a popular villain from the movie. His unique look makes for great nail art. Here are some ideas:
- Green Base: Start with a green base coat.
- Black Stitches: Add black stitches for a spooky look.
- Glow in the Dark: Use glow-in-the-dark polish for extra fun.
Check out this table for more Oogie Boogie nail art ideas:
| Design Element | Description |
|---|---|
| Dice | Paint small dice on your nails for a gambling theme. |
| Bug Shapes | Draw tiny bugs to represent Oogie Boogie’s creepy nature. |
| Sack Texture | Create a burlap sack texture using a textured polish. |
Other Villain Ideas
Don’t stop at Oogie Boogie! Other villains from the movie offer great nail art inspiration. Here are some ideas:
- Jack Skellington: Use black and white stripes.
- Sally: Paint colorful patches and stitches.
- Lock, Shock, and Barrel: Use bright colors and mischievous faces.
For more details, see the table below:
| Character | Design Idea |
|---|---|
| Jack Skellington | Black and white stripes with Jack’s face. |
| Sally | Colorful patches and stitches for a quilted look. |
| Lock, Shock, and Barrel | Bright colors and their mischievous faces. |
Get your nail polish ready and start creating! These villain-inspired designs will make your nails stand out.
Adding Holiday Elements
Adding holiday elements to your Nightmare Before Christmas nail art can be fun. The blend of Christmas and Halloween creates a unique look. Here are some ideas to incorporate both holidays into your nail design.
Christmas Touches
Incorporate classic Christmas symbols to bring out the festive spirit. You can draw tiny Christmas trees on your nails. Add some red and green glitter for a sparkling effect. Consider using snowflake patterns for a wintery touch. You can also paint tiny Santa hats on some nails. These details will make your nails look merry.
Halloween Spooky Elements
Halloween elements can add a spooky touch to your nail art. Paint tiny Jack Skellington faces on a few nails. Use black and orange colors to create a Halloween vibe. Draw some spider webs for extra spookiness. You can also add pumpkin designs to your nails. These elements will make your nails look spooky and fun.
Finishing Touches And Top Coats
Creating intricate Nightmare Before Christmas nail art requires attention to detail. The final steps, such as finishing touches and top coats, are crucial. These steps ensure your design remains vibrant and protected for weeks.
Sealing Your Design
Once your nail art is complete, it’s time to seal the design. Apply a clear top coat generously. This will protect your artwork from chipping and fading.
Ensure the top coat covers the entire nail, including edges. This creates a barrier against everyday wear and tear. For best results, allow the top coat to dry thoroughly.
Adding Glitter Or Matte Finishes
To add extra flair, consider incorporating different finishes. Glitter finishes can make your nails sparkle and catch the light. Simply apply a glitter top coat over your design.
If you prefer a more subdued look, choose a matte top coat. This will give your nails a smooth, non-glossy finish. Matte top coats can add a unique twist to traditional nail art.
Experiment with both finishes to see which one complements your Nightmare Before Christmas nail art best. You can even mix and match for a creative look.
| Type of Finish | Effect |
|---|---|
| Glossy | Shiny and reflective |
| Glitter | Sparkling and eye-catching |
| Matte | Smooth and non-glossy |
Whether you choose glossy, glitter, or matte, these finishing touches will enhance your design. Keep your nails looking fresh and festive for any occasion.
Maintenance Tips
Keeping your Nightmare Before Christmas nail art looking fresh can be a challenge. With the right care, you can make it last longer. Follow these maintenance tips to enjoy your spooky nails for weeks.
Prolonging Your Nail Art
To prolong your nail art, follow these simple steps:
- Avoid Harsh Chemicals: Wear gloves while cleaning or washing dishes.
- Moisturize Regularly: Use hand cream to keep your nails hydrated.
- Be Gentle: Avoid using your nails as tools.
| Activity | Precaution |
|---|---|
| Cleaning | Wear gloves |
| Typing | Use pads of fingers |
| Gardening | Use protective gloves |
Touch-up Techniques
Even the best nail art needs touch-ups. Here are some tips:
- Keep a Matching Polish: Use it to cover small chips.
- Use a Top Coat: Apply a fresh layer every few days.
- Repair with Nail Glue: Fix any lifted edges promptly.
By following these maintenance tips, your Nightmare Before Christmas nail art will stay beautiful and last longer.

Credit: m.youtube.com
Frequently Asked Questions
What Is Nightmare Before Christmas Nail Art?
Nightmare Before Christmas nail art features designs inspired by the iconic characters. It’s perfect for fans of the movie. Popular designs include Jack Skellington, Sally, and spooky patterns.
How To Do Nightmare Before Christmas Nails?
Start with a base coat, then paint themed designs using fine brushes. Use nail stickers for detailed characters. Finish with a top coat.
Where To Buy Nightmare Before Christmas Nail Decals?
You can find Nightmare Before Christmas nail decals on websites like Etsy, Amazon, and specialized nail art stores. They offer various designs.
Can I Use Regular Nail Polish For This Art?
Yes, regular nail polish works. Ensure you have a good base and top coat for durability. Use fine brushes for details.
Conclusion
Creating Nightmare Before Christmas nail art is a fun and creative way to celebrate the spooky season. This unique style will make your nails stand out and impress everyone. Embrace the Halloween spirit with these designs and showcase your artistic flair.
Try these nail art ideas and enjoy the festive vibes!