Nightmare Before Christmas nail ideas include Jack Skellington designs, Sally stitches, and spooky patterns. These nails capture the essence of the iconic film.
Nightmare Before Christmas-themed nails are perfect for fans of the beloved movie. They allow you to showcase characters like Jack Skellington, Sally, and Oogie Boogie. Choose from a variety of designs, including eerie stripes, intricate stitches, and pumpkin faces. These nail ideas are great for Halloween or any time you want to embrace your love for Tim Burton’s classic.
With bold colors and unique patterns, these nails will surely stand out. Whether you prefer simple designs or more detailed artwork, there’s something for everyone. Get ready to impress with your Nightmare Before Christmas-inspired nails!
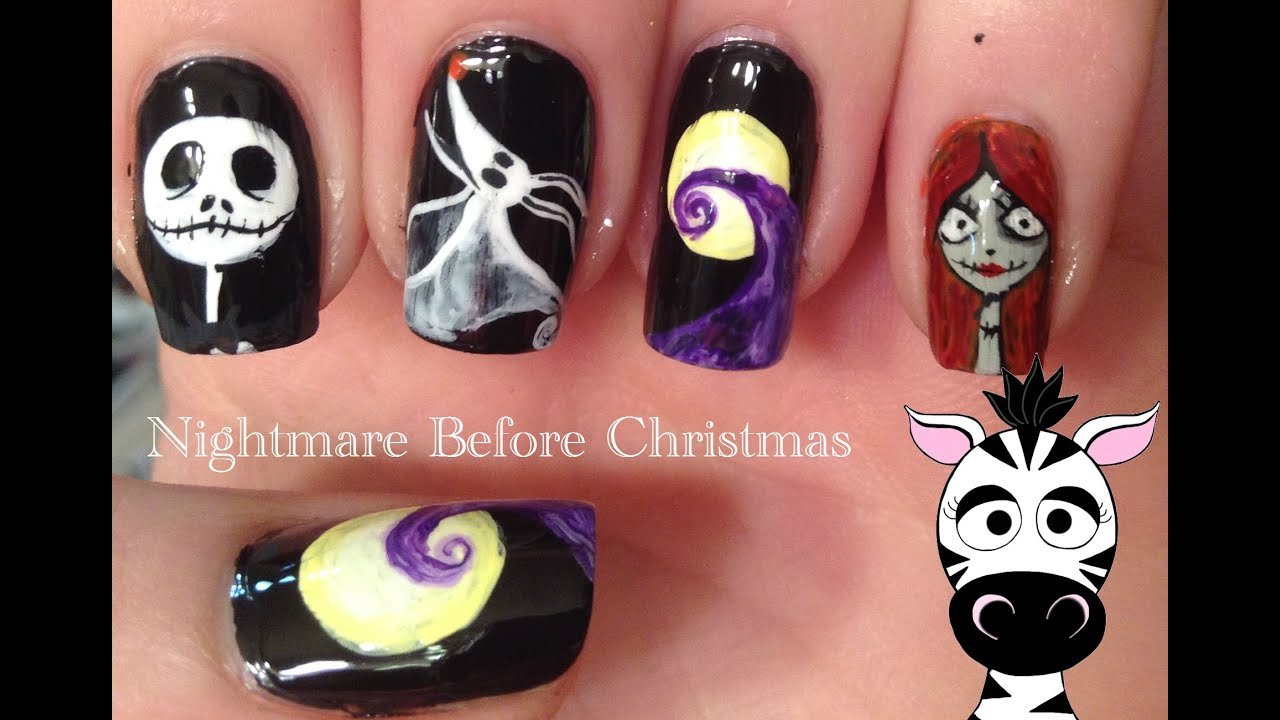
Classic Jack Skellington
Jack Skellington is a beloved character from Nightmare Before Christmas. His iconic look makes for amazing nail art. Let’s explore some of the best ideas.
Black And White Stripes
Jack Skellington’s black and white suit is instantly recognizable. These stripes make for a stunning nail design. Here’s how you can create it:
- Start with a white base coat.
- Use a thin brush for black stripes.
- Seal the design with a top coat.
This design is simple yet elegant. It captures the essence of Jack’s style perfectly.
Signature Skull Design
Jack Skellington’s skull is iconic. Adding it to your nails can be fun and spooky. Follow these steps:
- Paint your nails with a black base coat.
- Use a dotting tool to create white circles for eyes.
- Add small black dots inside for pupils.
- Draw a thin line for the mouth with black polish.
- Add small vertical lines for stitches.
- Finish with a glossy top coat.
This design is perfect for Halloween. It adds a spooky touch to your look.
| Design | Difficulty | Time |
|---|---|---|
| Black and White Stripes | Easy | 15 minutes |
| Signature Skull Design | Moderate | 30 minutes |

Credit: www.amazon.com
Sally-inspired Nails
Creating Sally-Inspired Nails from The Nightmare Before Christmas can be a fun project. Sally’s unique look can translate into stunning nail art.
Patchwork Patterns
Sally’s dress features different patches of colorful fabric. To recreate this on your nails, use a variety of nail polish colors.
- Start with a base coat to protect your nails.
- Choose colors like red, blue, and yellow for the patches.
- Apply each color in random shapes on your nails.
- Let each section dry before adding another color.
Use a thin brush for cleaner lines. The patchwork look will stand out beautifully.
Stitch Detailing
Sally’s look wouldn’t be complete without her signature stitches. Adding stitch detailing to your nails can be simple and effective.
- After creating the patchwork pattern, use a black nail polish for the stitches.
- Draw small, vertical lines along the edges of the patches.
- Make sure the lines are thin to mimic real stitches.
Stitch detailing adds a finishing touch that makes the nails look authentic.
Here is a quick summary table:
| Step | Detail |
|---|---|
| 1 | Apply a base coat. |
| 2 | Add colorful patches with nail polish. |
| 3 | Let each section dry. |
| 4 | Draw stitch details with black polish. |
With these steps, you can create stunning Sally-inspired nail art. Let your creativity shine and enjoy the spooky yet beautiful results!
Oogie Boogie Designs
Oogie Boogie nails bring spooky fun to your look. These designs are perfect for fans of the Nightmare Before Christmas. Add some frightful flair to your fingers with these creative ideas.
Glow In The Dark
Imagine your nails glowing in the dark like Oogie Boogie. Use glow-in-the-dark nail polish to achieve this effect. Paint your nails a creepy green, then add Oogie Boogie’s face with black polish. Turn off the lights, and watch your nails come to life!
Burlap Texture
Oogie Boogie’s body looks like burlap. You can mimic this texture on your nails. Use a textured nail polish or a nail stencil to create a burlap look. Paint your nails in a tan color, then add the burlap effect. Complete the design with tiny stitches using black polish for an authentic look.
Zero The Ghost Dog
Zero, Jack Skellington’s loyal ghost dog, is a fan favorite. Zero’s charm makes it perfect for unique nail designs. Let’s explore some Nightmare Before Christmas nail ideas featuring this adorable spectral pup.
Cute Canine Features
Highlight Zero’s cute features on your nails. Start with a white base to represent Zero’s ghostly form. Add tiny black dots for his eyes and a small orange dot for his glowing nose.
- White base coat
- Black dots for eyes
- Orange dot for nose
Use a fine brush for the details. This ensures the design stays neat. Zero’s floppy ears can be drawn with simple lines. This design is both cute and spooky.
Ghostly Glow
Make Zero’s nose glow with a special touch. Use glow-in-the-dark nail polish for his nose. This effect is perfect for Halloween nights.
| Step | Details |
|---|---|
| 1 | Apply white base coat |
| 2 | Draw Zero’s eyes with black dots |
| 3 | Use glow-in-the-dark polish for nose |
Let your nails charge under light to enhance the glow. Once charged, your nails will shine in the dark. This gives an eerie yet adorable effect. Your Zero-inspired nails will be a hit at any Halloween party.
Pumpkin King
The Pumpkin King, Jack Skellington, is a beloved character from “The Nightmare Before Christmas.” His skeletal figure and iconic grin make him a favorite for nail art enthusiasts. Embrace the Halloween spirit and let your nails reflect Jack’s spooky charm.
Pumpkin Faces
Pumpkin faces are a classic element of Halloween. They offer endless possibilities for creativity. You can paint Jack’s face with his wide eyes and stitched smile. For a twist, add other pumpkin faces with different expressions.
- Use orange and black nail polish.
- Draw different expressions on each nail.
- Add some glitter for extra sparkle.
Autumnal Colors
Autumnal colors like orange, brown, and red are perfect for this theme. These colors capture the essence of fall and Halloween. Combine them with Jack’s black and white for a striking contrast.
| Color | Effect |
|---|---|
| Orange | Warm and inviting |
| Brown | Earthy and cozy |
| Red | Bold and vibrant |
Mix and match these colors for a unique look. Use them as background colors or as accents to Jack’s face.
Creepy Christmas
Embrace the unique blend of Halloween and Christmas with Nightmare Before Christmas nail ideas. Create a spooky yet festive look that stands out during the holidays.
Festive Yet Spooky
Combine festive elements with spooky designs. Use dark colors like black and purple. Add Christmas elements like snowflakes and candy canes. This creates a perfect Nightmare Before Christmas vibe.
- Black base with white snowflakes
- Purple nails with candy cane stripes
- Skeleton designs with red Christmas hats
Red And Green With A Twist
Traditional Christmas colors can have a spooky twist. Use red and green with Nightmare Before Christmas elements. Think of Jack Skellington’s face or Oogie Boogie’s silhouette.
- Red and green stripes with Jack Skellington’s face
- Green nails with Oogie Boogie’s silhouette
- Red nails with black spider webs
| Design | Color Combination | Elements |
|---|---|---|
| Skeleton with Christmas hat | Black and Red | Skeleton, Christmas hat |
| Jack Skellington’s face | Red and Green | Stripes, Jack Skellington |
| Spider webs | Red and Black | Spider webs |
Accessorizing Your Nails
Transform your nails into a spooky masterpiece with simple accessories. Small details can make your Nightmare Before Christmas nail designs pop. Adding rhinestones or using nail stickers can make a big difference. These accessories are easy to apply and add an extra layer of fun.
Adding Rhinestones
Rhinestones can bring sparkle to your nail designs. They are available in many colors and sizes. You can place them on the tips of your nails or near the cuticles.
How to Apply Rhinestones:
- Paint your nails with a base color.
- Use a dotting tool to place a small amount of nail glue.
- Pick up a rhinestone with tweezers and place it on the glue.
- Press gently to secure the rhinestone.
- Apply a top coat to seal the rhinestones in place.
Rhinestones can create a dazzling effect. They can highlight specific designs like Jack Skellington’s face or Oogie Boogie’s silhouette.
Using Nail Stickers
Nail stickers are a quick way to add intricate designs. They come in various patterns and characters from the movie.
How to Use Nail Stickers:
- Choose a base color for your nails.
- Let the base coat dry completely.
- Select a sticker and peel it off the backing.
- Place the sticker on your nail and press down firmly.
- Apply a top coat to secure the sticker.
Nail stickers can save time and effort. You can mix and match different characters and scenes. This creates a cohesive but varied look.

Credit: www.youtube.com
Diy Vs Professional
Creating Nightmare Before Christmas nail designs can be a thrilling experience. You can either choose to do it yourself or visit a professional salon. Each option has its pros and cons. In this section, we will explore both DIY and professional approaches.
At-home Tips
Doing your own Nightmare Before Christmas nails at home can be fun. Here are some tips to help you:
- Gather your supplies: You will need nail polish, brushes, and nail stickers.
- Practice basic designs: Start with simple designs like Jack Skellington’s face.
- Use nail guides: These help you create clean lines and shapes.
- Watch tutorials: Many online videos can guide you step-by-step.
- Be patient: Nail art takes time, especially detailed designs.
Here is a simple table to help you pick the right tools:
| Tool | Purpose |
|---|---|
| Nail polish | Base color and design |
| Nail brushes | Detail work |
| Nail stickers | Quick designs |
| Top coat | Seal and protect |
Salon Recommendations
Choosing a professional salon for your Nightmare Before Christmas nails can ensure a polished look. Here are some recommendations:
- Research salons: Look for ones with good reviews and skilled technicians.
- Check portfolios: Many salons post pictures of their work online.
- Ask for consultations: Discuss your design ideas with the technician.
- Consider costs: Professional nail art can be pricey but worth it.
- Book in advance: Popular salons might have long waiting lists.
Here are some benefits of choosing a professional salon:
- Expertise: Trained technicians can create intricate designs.
- Quality materials: Salons use high-quality polish and tools.
- Time-saving: Professionals can complete designs faster.

Credit: www.amazon.com
Frequently Asked Questions
What Are Some Nightmare Before Christmas Nail Ideas?
Nightmare Before Christmas nail ideas include Jack Skellington designs, Sally-inspired patchwork, and spooky pumpkin patterns. These designs are perfect for Halloween.
How Do I Create Jack Skellington Nails?
To create Jack Skellington nails, use black and white nail polish. Paint Jack’s iconic face with thin nail art brushes.
Can I Do Nightmare Before Christmas Nails At Home?
Yes, you can do Nightmare Before Christmas nails at home. Use nail art tools, polish, and reference images.
What Tools Are Needed For Nightmare Before Christmas Nails?
You need nail polish, thin brushes, dotting tools, and nail decals. These tools help create detailed designs.
Conclusion
Embrace your spooky side with these Nightmare Before Christmas nail ideas. Perfect for any fan, these designs are sure to impress. Experiment with colors, patterns, and characters to showcase your creativity. Don’t wait; start planning your hauntingly beautiful manicure today.
Your nails will be the talk of Halloween and beyond!